Difference between revisions of "Considerations for tomogram positioning in IMOD"
m |
|||
| Line 22: | Line 22: | ||
ReconstructionState.a.sample.AxisZShift=0.0</tt> | ReconstructionState.a.sample.AxisZShift=0.0</tt> | ||
| − | to zero. 6) Open the ''tomopitch.com'' file and set the two values to zero. 7) Reopen etomo and check that it worked. | + | to zero. 6) Open the ''tomopitch.com'' file and set the two corresponding values to zero. 7) Reopen etomo and check that it worked. |
Latest revision as of 15:34, 9 April 2019
During tomogram reconstruction in IMOD, the dimensions of the final tomogram need to be calculated in the "tomogram positioning" step. In this step, we recommend to keep the x-axis tilt and angle offset at zero and to leave enough room above and below the sample in the tomogram. Keeping the x-axis tilt and angle offset at zero facilitates the interpretation of the tomograms, because only then the z-axis corresponds to the direction of the electrons. It also saves us from adapting the missing wedge mask at later steps. Leaving enough space at the top and bottom of the sample in the tomogram is necessary because it allows Dynamo to crop subvolumes from sample that is close to the ice surfaces, as illustrated in the figure below:
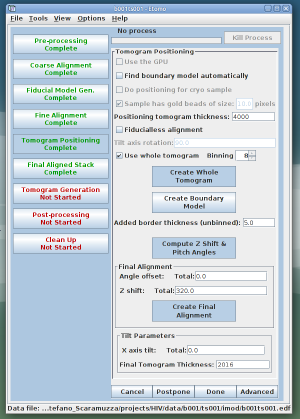
To keep the x-axis tilt and angle offset at zero and to keep the tomogram thick enough we need to proceed as follows. First we choose a fairly large thickness for the sample tomogram (the sample tomogram will just be used to set the boundaries, it has not the final tomogram size). In the example below, an initial thickness of 4000 pixels is chosen. We also select a binning level of 4 or 8 to save computing time.
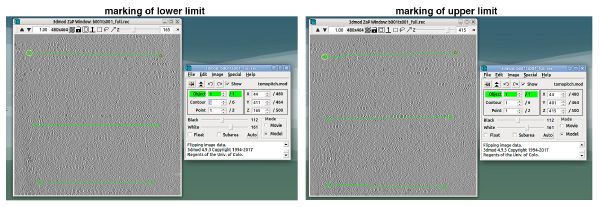
After we create the sample tomogram, we open it to set the boundaries. Here we do not follow the IMOD tutorial but just stay in the normal 3dmod view and set the lower and upper boundaries as shown in the figure below. This will prevent the introduction of any x-axis tilt and angle offset. It is important that in this step we leave enough space above and below the sample. We should be very generous with that (as explained in the first figure). After saving the model and clicking on “compute Z shift & pitch angles”, there should be displayed a new z-shift and final tomogram thickness, but the x-axis tilt and angle offset should still be 0.0.

Note: If you click the button “compute Z shift & pitch angles” again, the newly computed value of the z-shift is added to the previously computed one. Therefore, make sure to click this button only once. Also, if you have generated an offset angle by mistake, you can not simply set it to zero again. In the case where a z-shift needs to be recomputed or where an already computed offset angle needs to be removed, the following steps need to be done: 1) Go to the "Tomogram Positioning" step and set the "Angle offset" and "Z shift" to zero. 2) Go to the "Fine Alignment" step and set the two values to zero too. Do not go back to the "Tomogram Positioning" step. 3) Instead, in the top left corner click "File" and then "Save". 4) Close etomo. 5) Open the *edf file and set the two parameters
TotalReconstructionState.a.sample.AngleOffset=0.0 ReconstructionState.a.sample.AxisZShift=0.0
to zero. 6) Open the tomopitch.com file and set the two corresponding values to zero. 7) Reopen etomo and check that it worked.

