Difference between revisions of "Basic detector workflow for Lacey grids"
Jump to navigation
Jump to search
(Created page with "This is the default detection workflow for the Hole Picker, suitable for Lacey grids. Its execution GUI comprises 8 steps. ==Algorithmic step...") |
|||
| Line 19: | Line 19: | ||
===Point reordering=== | ===Point reordering=== | ||
| − | + | [[File:membraneWorkflowUserPoints.png|thumb|upright|350px| Steps in the basic lacey workflow]] | |
==Workflow GUI== | ==Workflow GUI== | ||
| Line 26: | Line 26: | ||
==Support tools== | ==Support tools== | ||
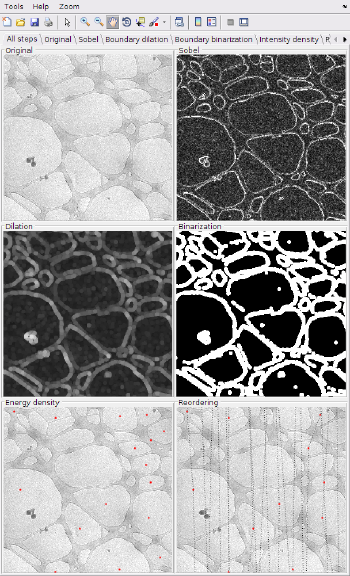
With the Visualization menu in the workflow GUI you can launch a view that represents the result of all the steps in the workflow, updating the results after each execution. | With the Visualization menu in the workflow GUI you can launch a view that represents the result of all the steps in the workflow, updating the results after each execution. | ||
| + | |||
| + | {|style="margin: 0 auto;" | ||
| + | | [[File:BasicLaceySupportingGUIGlobal.png|thumb|center|350px| Steps in the basic lacey workflow]] | ||
| + | | [[File:BasicLaceySupportingGUILocal.png|thumb|center|350px| Synchronized zoom on a region inside the polygon]] | ||
| + | |} | ||
Revision as of 17:11, 13 February 2017
This is the default detection workflow for the Hole Picker, suitable for Lacey grids. Its execution GUI comprises 8 steps.
Contents
Algorithmic steps
Sobel filtering
Produces and image that enhances the boundaries between holes and carbon.
Boundary dilation
Uses the dilation morphological operator to widen the found boundaries.
Binarization
Size based roi selection
Thinning of selected points
Point reordering
Workflow GUI
The GUI allows for independent execution of each step.
Support tools
With the Visualization menu in the workflow GUI you can launch a view that represents the result of all the steps in the workflow, updating the results after each execution.
File:BasicLaceySupportingGUIGlobal.png Steps in the basic lacey workflow |

